How to Create a SharePoint List? A Step-by-Step Guide

How to Create a SharePoint List?
Creating a SharePoint List is a straightforward process that can be completed in a few steps. In this guide, we’ll walk you through creating a SharePoint List from scratch, using templates, and exploring the various options available during list creation.
Step 1: Access the SharePoint Site
To create a SharePoint List, first, access your SharePoint site by navigating to the site URL in your web browser.
Step 2: Click on the ‘Create’ Button
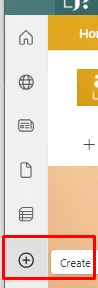
Click on the ‘Create’ button located on the bottom left corner of the SharePoint site homepage.
Step 3: Select ‘List’
From the drop-down menu, select ‘List’ to create a new SharePoint List.
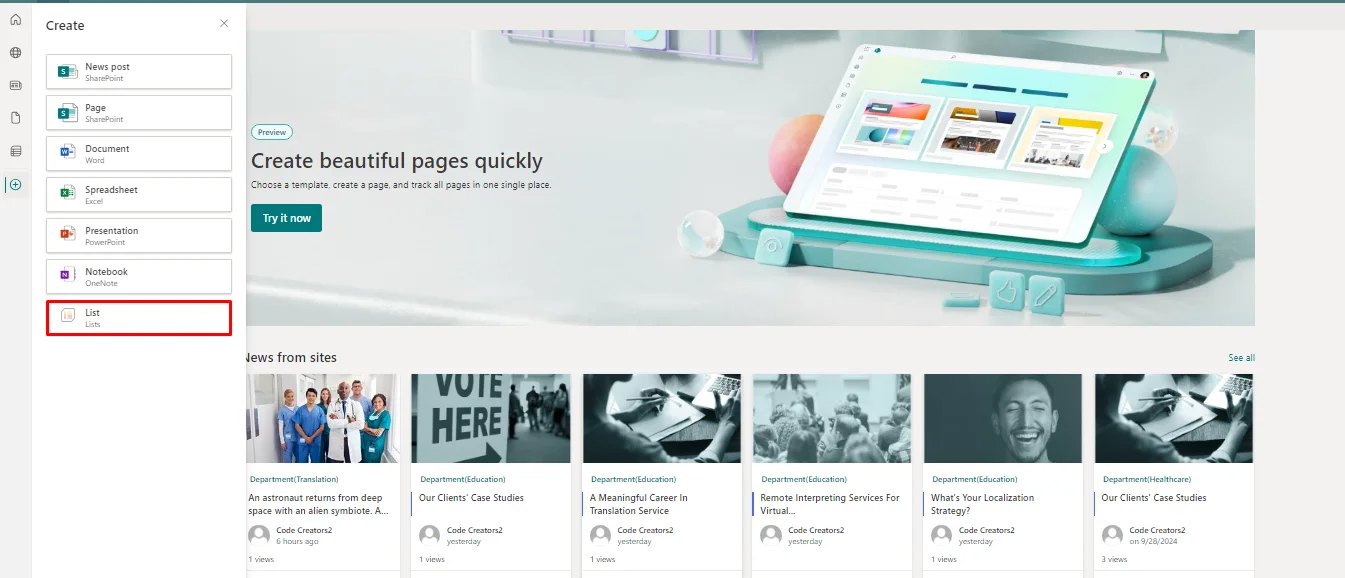
Method 1: Create a List from Scratch
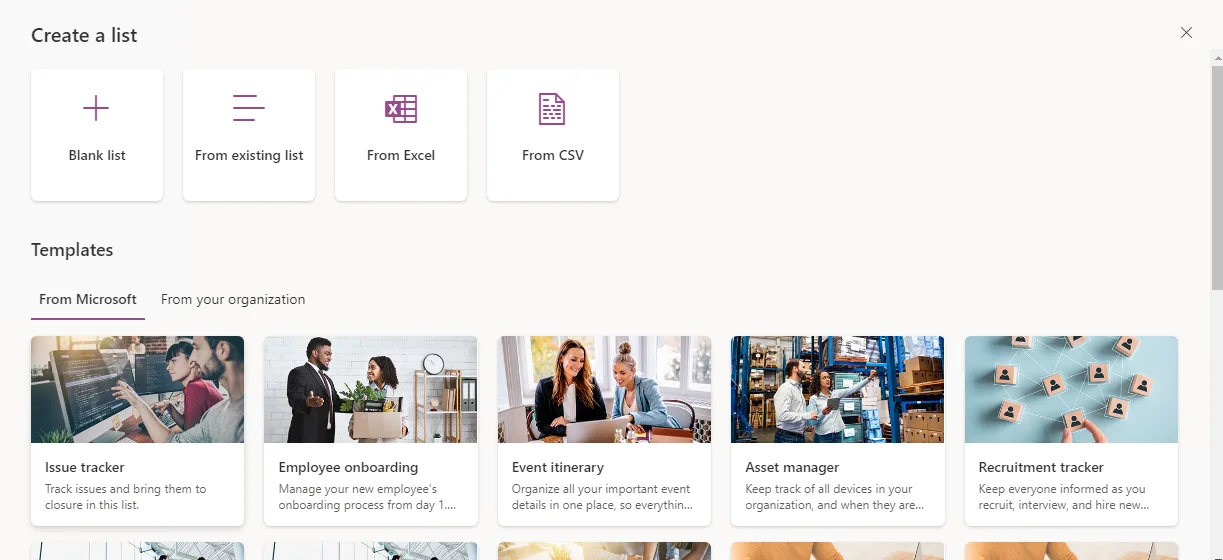
To create a list from scratch, click on the ‘Create a list’ button.
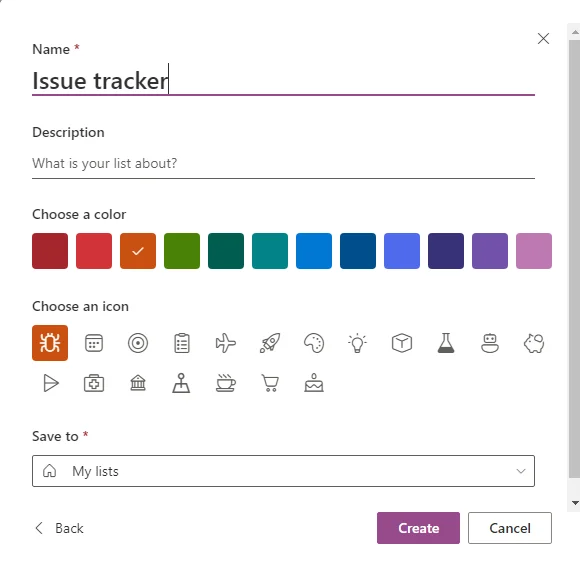
Step 4: Enter the List Name and Description
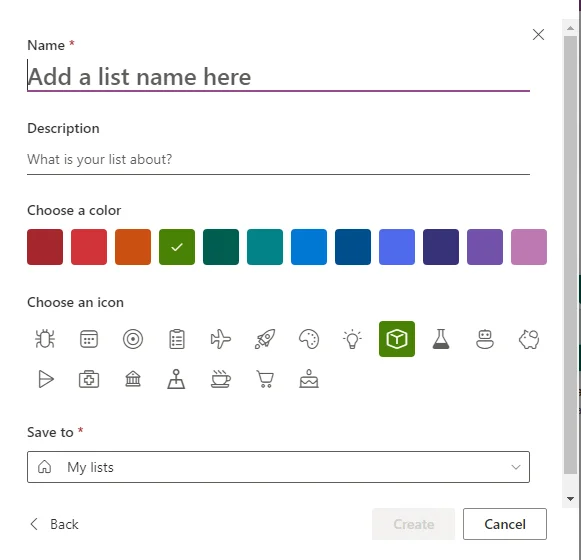
Enter a name and description for your list. The name will appear as the title of your list, and the description will provide a summary of the list’s purpose.
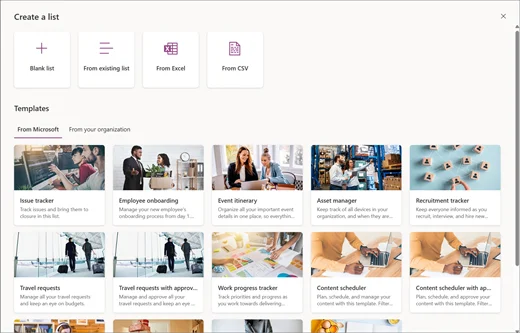
Step 5: Choose a Template (Optional)
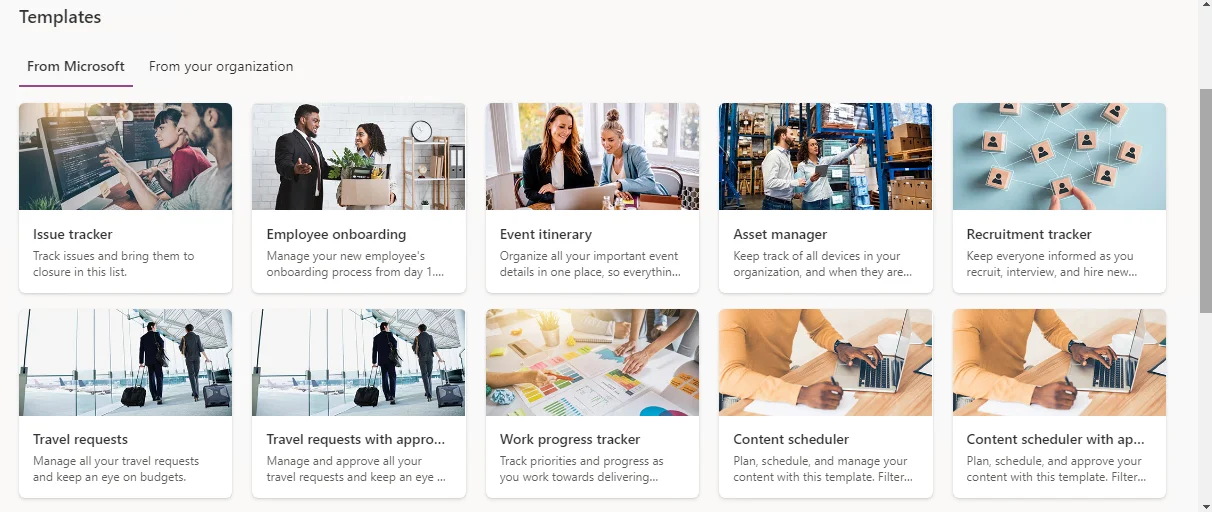
If you want to use a pre-built template, click on the ‘Choose a template’ button. SharePoint provides various templates for common list types, such as contacts, tasks, and events.
Available Templates
- Contacts: A list for storing contact information, including names, addresses, and phone numbers.
- Tasks: A list for tracking tasks and projects, including due dates and assignments.
- Events: A list for scheduling events, including meetings, appointments, and deadlines.
- Custom List: A blank list template for creating a custom list from scratch.
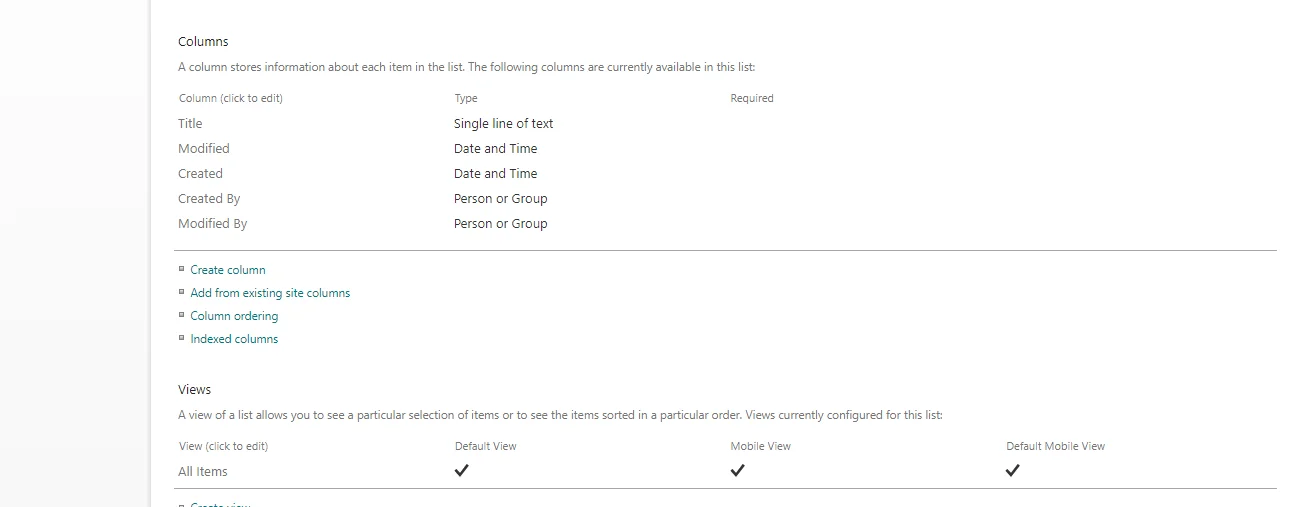
Step 6: Configure List Settings

Configure the list settings, including the columns, data types, and permissions. You can add or remove columns, set default values, and specify the data type for each column.
Step 7: Click ‘Create’

Click the “Create” button to create the list.
Method 2: Create a List from a Template
To create a list from a template, select the desired template from the “Choose a template” page.
Step 4: Enter List Name and Description
Enter a name and description for your list.
Step 5: Configure List Settings

Configure the list settings, including the columns, data types, and permissions.
Step 6: Click ‘Create’
Click the “Create” button to create the list.
Tips & Variations
- You can also create a list from an existing list or Excel spreadsheet by clicking on the ‘From an existing list’ or ‘From an Excel spreadsheet’ button.
- SharePoint provides various list types, including custom lists, survey lists, and picture libraries.
- You can customize the list settings and columns after creating the list.
By following these steps, you can create a SharePoint List from scratch or using a template. SharePoint Lists provide a powerful tool for storing and managing data, and with these instructions, you’re ready to get started!
Create SharePoint List from Excel
Benefits of Importing Data from Excel to SharePoint Lists
- Centralize data management: Move data from individual Excel files to a collaborative platform, making it easier to manage and share.
- Improve data accuracy: Reduce errors and inconsistencies by using a single source of truth.
- Enhance collaboration: Allow team members to access and update data in real-time, promoting collaboration and productivity.
- Increase scalability: SharePoint Lists can handle large datasets, making it an ideal solution for growing teams.
Step-by-Step Process to Create SharePoint List from Excel Spreadsheet
Prerequisites
- Excel spreadsheet with data to be imported.
- SharePoint site with necessary permissions.
Step 1: Prepare Your Excel Spreadsheet
- Ensure your Excel spreadsheet is organized with clear column headers and data.
- Remove any unnecessary columns or rows.
- Save your Excel file in a location accessible by your SharePoint site.
Step 2: Navigate to Your SharePoint Site
- Log in to your SharePoint site and navigate to the site where you want to create the list.
- Click on the ‘Lists’ or ‘Apps’ link in the top navigation menu.
Step 3: Create a New List
- Click on the ‘New List’ or ‘Add an app’ button.
- Select ‘Import Spreadsheet’ from the available list templates.
- Click ‘Next’ to proceed.
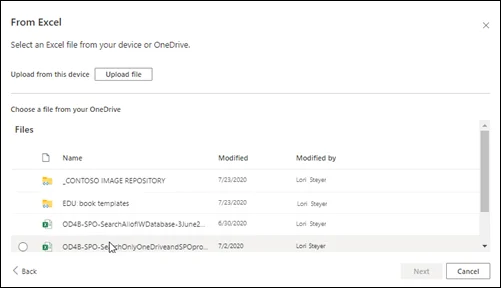
Step 4: Select Your Excel File
- Click ‘Browse’ to select your prepared Excel file.
- Choose the file and click ‘Open’.
- Click ‘Next’ to proceed.
Step 5: Map Columns and Import Data
- SharePoint will automatically detect the columns in your Excel file.
- Review and adjust the column mappings as needed.
- Click “Import” to start the import process.
Step 6: Configure List Settings (Optional)
- After the import is complete, you can configure list settings, such as:
- List name and description.
- Column settings and data types.
- Permissions and access control.
Common Issues & Troubleshooting Tips
| Issue | Solution |
|---|---|
| File is too large to upload | Break down the Excel file into smaller chunks or use the SharePoint ‘Upload Large Files’ feature. |
| Column mapping failed | Review column headers and data types in both Excel and SharePoint to ensure consistency. |
| Data not importing correctly | Check Excel file formatting, data types, and column headers. Ensure SharePoint list settings match the Excel file structure. |
By following these steps and troubleshooting tips, you can successfully create SharePoint List from an Excel spreadsheet, unlocking the benefits of centralized data management and collaboration.
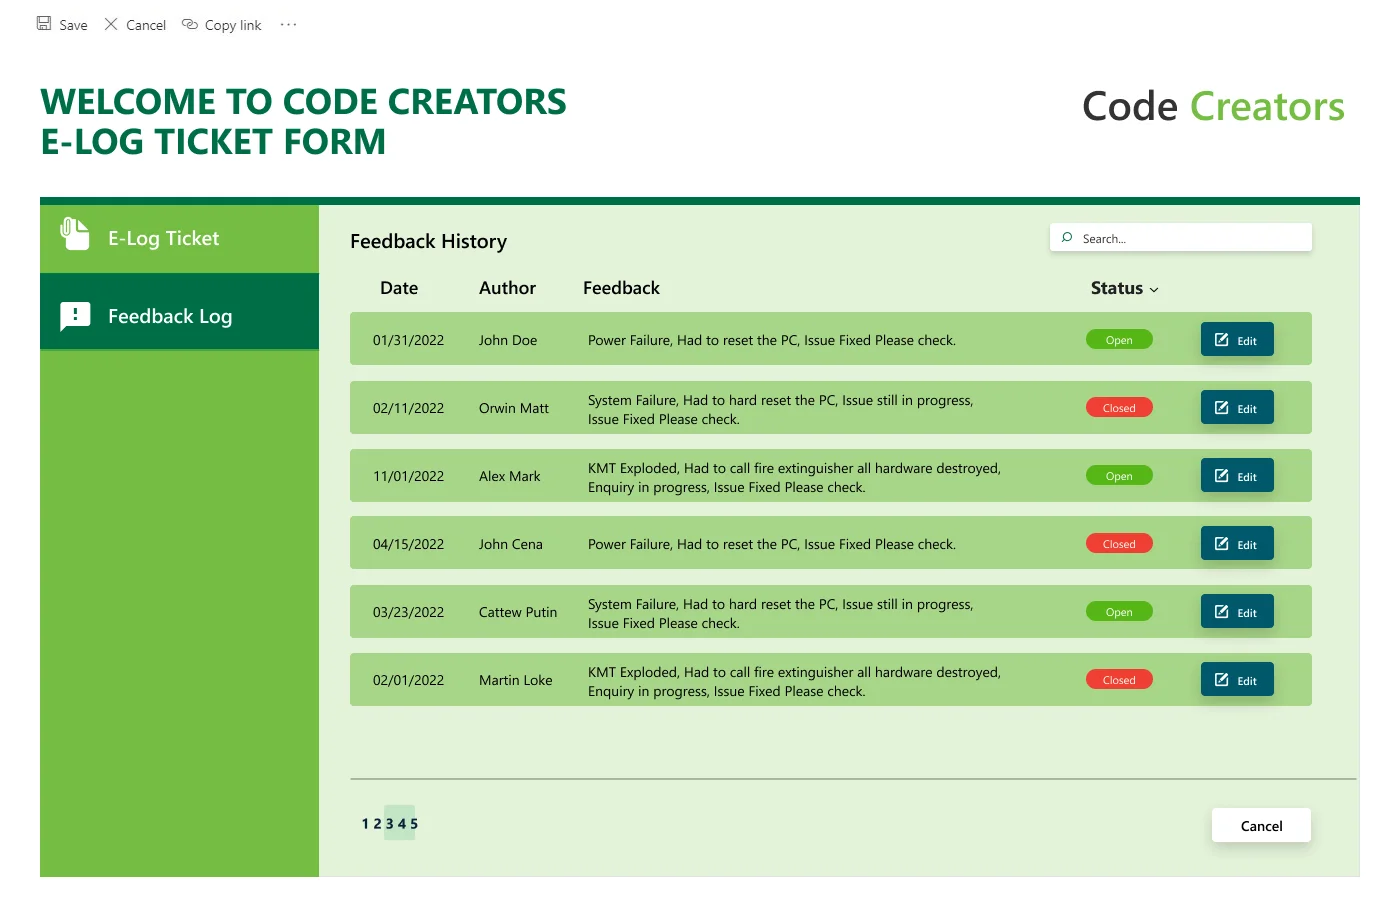
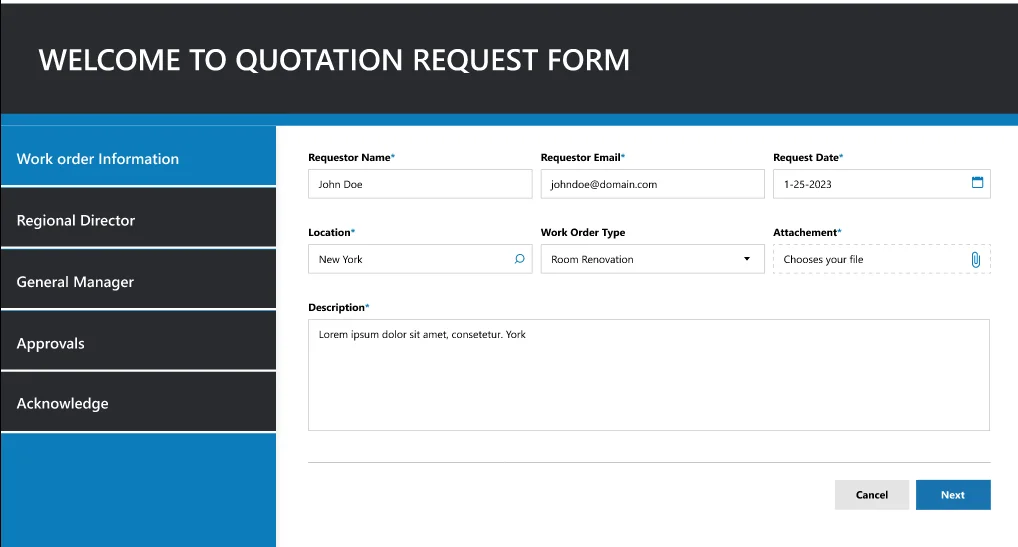
SharePoint List Forms
SharePoint list forms enable users to customize the user interface of the list. Users can create custom forms using Power Apps, which can enhance the user experience and improve data entry.
Overview of Default & Customized Forms for SharePoint Lists
- Default Forms: Out-of-the-box forms provided by SharePoint for creating, editing, and viewing list items.
- Customized Forms: Tailored forms that meet specific business needs, enhancing user experience and improving data accuracy.
Benefits of Customized Forms
- Improved user experience: Simplify data entry and reduce errors with intuitive and user-friendly forms.
- Increased productivity: Automate business processes and workflows, reducing manual effort and increasing efficiency.
- Enhanced data accuracy: Validate and enforce data entry rules, ensuring consistency and quality of data.
How to Customize SharePoint List Forms using Power Apps
1. Prerequisites
- SharePoint Online or SharePoint Server 2019.
- Power Apps license.
- Basic understanding of Power Apps and SharePoint Lists.
2. Step-by-Step Process
Step 1: Create a new Power App
- Navigate to Power Apps: Go to powerapps.com and sign in with your credentials.
- Create a new app: Click on the “Create an app” button and select ” SharePoint” as the data source.
- Select the SharePoint list: : Choose the SharePoint list you want to customize the form for.
- Click ‘Connect’: Connect to the SharePoint list and create a new Power App.
Step 2: Design the Form
- Open the Power Apps designer: The Power Apps designer will open with a blank canvas.
- Add controls and fields: The Power Apps designer will open with a blank canvas.
- Configure control properties: Set properties for each control, such as label text, data type, and formatting.
- Add logic and rules: Use formulas and rules to create conditional logic, validation, and calculations.
Step 3: Configure Form Settings
- Form properties: Set up form properties, such as:
- Layout: Choose a layout template or create a custom layout.
- Theme: elect a theme to match your organization’s branding.
- Behavior: Configure form behavior, such as submission settings and error handling.
- Form settings: Configure additional settings, such as:
- Form title and description.
- Form navigation.
- Error messages and warnings.
Step 4: Publish and Deploy
- Publish the app: Click the ‘Publish’ button to save and publish the app.
- Deploy to SharePoint: Click the ‘Deploy’ button to deploy the app to your SharePoint site.
- Select the SharePoint site: Choose the SharePoint site where you want to deploy the app.
- Add the app to a SharePoint page: Add the app to a SharePoint page, such as a list view or a web part page.
By following these steps, you can create a customized SharePoint List form using Power Apps that meets your specific business needs and enhances user experience.
3. Examples of Custom Forms to Enhance User Experience
- Employee Onboarding Form: A customized form that guides HR personnel through the onboarding process, automating tasks and reducing paperwork.

- Customer Feedback Form: A user-friendly form that collects customer feedback, with conditional logic and validation to ensure accurate and complete data.
- Expense Report Form: A customized form that simplifies expense reporting, with automated calculations and approval workflows.
4. Tips & Best Practices
- Keep it simple: Design forms that are easy to use and understand.
- Use conditional logic: Automate form behavior based on user input and business rules.
- Test and iterate: Test your custom form with real users and iterate feedback to improve the user experience.
By customizing SharePoint List forms using Power Apps, you can create tailored solutions that meet specific business needs, enhancing user experience and improving data accuracy.
Managing SharePoint Lists
SharePoint List Permissions
A. Permission Settings
SharePoint Lists have three primary permission levels:
- Read: Users can view list items but cannot edit or delete them.
- Contribute: Users can view, edit, and delete list items, but cannot manage list settings or permissions.
- Full Control: Users have complete control over the list, including managing settings, permissions, and content.
Additionally, SharePoint Lists have several permission levels that can be customized:
- Edit: Users can edit list items but cannot delete them.
- Delete: Users can delete list items but cannot edit them.
- Manage Permissions: Users can manage permissions for the list.
- Manage Lists: Users can manage list settings, including adding or removing columns.
B. Managing & Customizing List Permissions
To manage and customize list permissions:
- Navigate to the List Settings page:
- Click on ‘Permissions’: In the List Settings page, click on the ‘Permissions’ link.
- Click on ‘Permissions’: Click on the “Add users” or “Remove users” buttons to manage user permissions.
- Adjust permission levels: Select a user or group and adjust their permission level using the dropdown menu.
- Create custom permission levels: Click on the “Permission Levels” button to create custom permission levels.
C. Best Practices for Securing SharePoint Lists
- Limit access:
- Use groups: Instead of assigning individual permissions, use groups to simplify permission management.
- Regularly review permissions: : Regularly review permission settings to ensure they are up-to-date and accurate.
- Regularly review permissions: Use inheritance to simplify permission management and reduce the risk of permission errors.
- Use SharePoint’s built-in security features: Use SharePoint’s built-in security features, such as information rights management (IRM) and encryption, to protect sensitive data.
By following these best practices, you can ensure that your SharePoint Lists are secure and only accessible to authorized users.
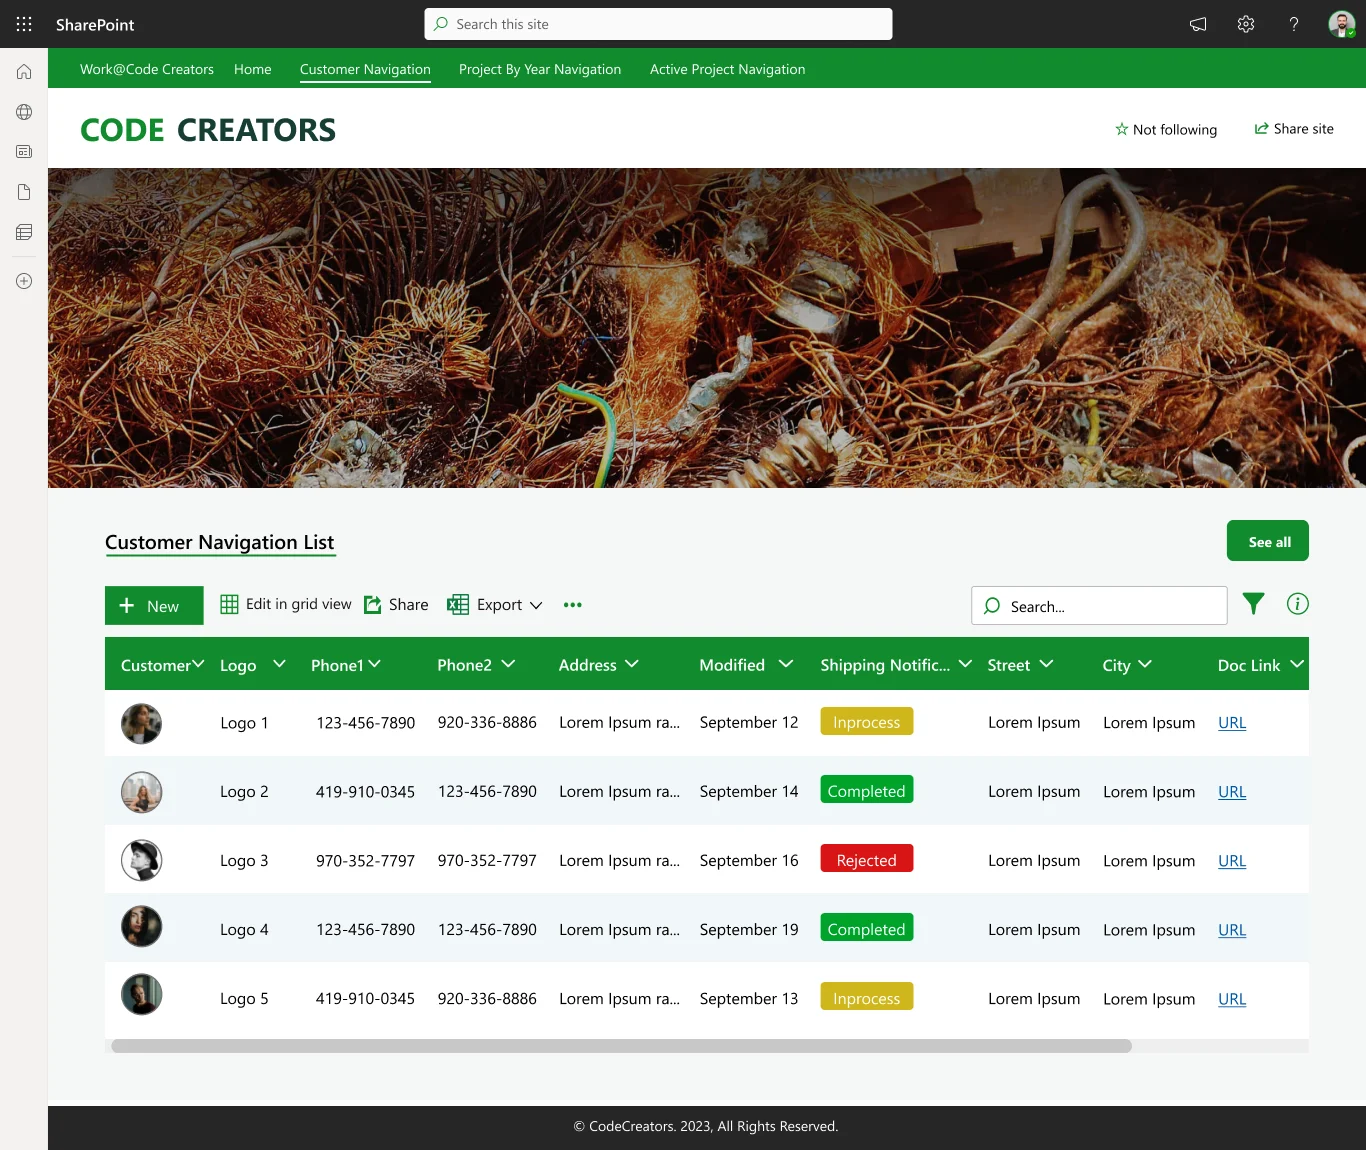
SharePoint List View Styles
A. Different View Styles
SharePoint Lists offer various view styles, including:
- Standard View: Displays list items in a table format, with columns and rows.
- Calendar View: Displays list items in a calendar format, making it easy to track deadlines and events.
- Gallery View: Displays list items in a visual format, with images and descriptions.
- Datasheet View: Displays list items in a spreadsheet format, allowing for quick editing and data manipulation.
- Custom View: Allows for customization of the view style, including adding or removing columns, filtering data, and applying sorting and grouping.
B. Creating and Customizing List Views
To create and customize list views:
- Navigate to the List Settings page: Click on the gear icon in the top-right corner of the list and select ‘List Settings’.
- Click on ‘Create View’: In the List Settings page, click on the ‘Create View’ button.
- Select a view style: Choose the desired view style from the list of available options.
- Customize the view: Add or remove columns, filter data, and apply sorting and grouping as desired.
- Save the view: Click on the ‘OK’ button to save the view.
C. Examples of Using Different Views
- Calendar View: Use the Calendar view to track deadlines and events, such as project timelines or team meetings.
- Calendar View: Use the Gallery view to showcase images and videos, such as product catalogs or marketing materials.
- Datasheet View: Use the Datasheet view to quickly edit and manipulate data, such as updating multiple list items at once.
- Custom View: Use the Custom view to display data in a specific format, such as grouping items by category or filtering data based on specific criteria.
By using different view styles, you can present data in a way that is easy to consume and analyze, making it easier for users to find and use the information they need.
Note:The availability of certain view styles may depend on the version of SharePoint you are using.
SharePoint List View Threshold
The SharePoint list view threshold is a limit on the number of items that can be displayed in a list view. Users can optimize list performance by indexing columns, filtering views, and using other techniques to reduce the number of items in the list view.
What is the List View Threshold?
The list view threshold is a limitation in SharePoint that restricts the number of items that can be displayed in a single list view. This threshold is set to 5,000 items by default but can be increased or decreased by the SharePoint administrator.
Impact on List Performance
When a list view exceeds the threshold, it can significantly impact list performance, leading to:
- Slow page loads: Pages may take longer to load, causing frustration for users.
- Timeouts: The list view may timeout, preventing users from accessing the data.
- Server resource usage: Excessive server resource usage can lead to performance issues across the entire SharePoint farm.
Tips and Best Practices for Working Within the View Threshold
- Use filtering and sorting: Apply filters and sorting to reduce the number of items displayed in the list view.
- Create indexed columns: Indexing columns can improve query performance and reduce the load on the server.
- Use pagination: Implement pagination to limit the number of items displayed per page.
- Optimize list structure: Organize lists into smaller, more manageable sections to reduce the number of items in each view.
- Avoid complex views: Simplify views by reducing the number of columns and avoiding complex calculations.
Methods to Avoid Threshold Issues
- Indexing columns: Indexing columns can improve query performance and reduce the load on the server.
- Filtering views: Apply filters to reduce the number of items displayed in the list view.
- Using CAML queries: Use CAML (Collaborative Application Markup Language) queries to filter and sort data more efficiently.
- Using CAML queries: Use data aggregation to summarize data and reduce the number of items displayed.
- Using CAML queries: Leverage SharePoint’s built-in features, such as the ‘Item Limit’ feature, limit the number of items displayed in a list view.
Leverage SharePoint’s built-in features, such as the ‘Item Limit’ feature, limit the number of items displayed in a list view.
Overview of Limitations & Thresholds
SharePoint Lists have several limitations and thresholds that can impact their performance and functionality. These limitations include:
- List Item Limit: The maximum number of items that can be stored in a list.
- List View Threshold: The maximum number of items that can be displayed in a single list view.
- Column Limit: The maximum number of columns that can be created in a list.
- File Size Limit: The maximum size of files that can be uploaded to a list.
List Item Limit
The list item limit is the maximum number of items that can be stored in a SharePoint List. This limit varies depending on the version of SharePoint:
- SharePoint 2013 and 2016: 30,000,000 items per list
- SharePoint Online: 200,000 items per list (soft limit), but Microsoft recommends keeping lists under 100,000 items for optimal performance
Strategies to Manage and Optimize Lists within the Limits
- Archive and Purge: Regularly archive and purge old or unnecessary list items to keep the list size manageable.
- Use Folders and Subfolders: Organize list items into folders and subfolders to reduce the number of items in the root list.
- Create Separate Lists: Break down large lists into smaller, separate lists to avoid hitting the list item limit.
- Use SharePoint’s Built-in Features: Leverage SharePoint’s built-in features, such as the “Item Limit” feature, to limit the number of items displayed in a list view.
- Implement Data Governance: : Establish data governance policies to ensure that list items are properly managed and maintained.
- Use Third-Party Tools: Utilize third-party tools and add-ons to help manage and optimize large lists.
- Optimize List Structure: Optimize list structure by reducing the number of columns, using content types, and implementing data normalization.
By understanding the limitations and thresholds of SharePoint Lists and implementing these strategies, you can effectively manage and optimize your lists to ensure optimal performance and functionality.
SharePoint List Name
A. Importance of Naming Conventions for SharePoint Lists
Naming conventions for SharePoint Lists are crucial for several reasons:
- Organization: A well-structured naming convention helps to organize lists in a logical and consistent manner, making it easier to find and manage lists.
- Searchability: A clear and descriptive list name improves searchability, allowing users to quickly find the list they need.
- Collaboration: Consistent naming conventions facilitate collaboration among team members, reducing confusion and errors.
- Governance: A standardized naming convention helps to enforce governance policies and ensures compliance with organizational standards
B. Tips for Naming Lists for Better Organization and Search Ability
- Be Descriptive: Use descriptive names that clearly indicate the list’s purpose and content.
- Use a Consistent Format: Establish a consistent format for list names, such as using a specific prefix or suffix.
- Avoid Acronyms: Avoid using acronyms or abbreviations that may be unfamiliar to users.
- Use Keywords: Incorporate relevant keywords to improve searchability.
- Keep it Concise: Keep list names concise, but not too short, to ensure they are informative and easy to read.
C. Examples of Effective List Names
- HR Documents: ‘Employee Onboarding Documents – 2022’
- Sales Tracking: ‘Sales Leads – North America Region’
- IT Requests: ‘IT Service Requests – Hardware and Software’
- Marketing Assets: “Marketing Campaign Assets – Summer 2023’
D. Best Practices for List Naming Conventions
- Use a Standard Prefix: Use a standard prefix, such as “LIST-” or “SP-“, to distinguish lists from other SharePoint objects.
- Include a Date or Version: Include a date or version number to track changes and updates.
- Use a Consistent Suffix: Use a consistent suffix, such as “-Archive” or “-Backup”, to indicate the list’s purpose.
- Avoid Special Characters: Avoid using special characters, such as!, @, or #, which can make list names difficult to read and search.
- Avoid Special Characters: Establish a governance policy to ensure consistency and compliance across the organization.
By following these tips and best practices, you can create effective list names that improve organization, searchability, and collaboration in your SharePoint environment.
The Bottom Line
The step-by-step guide on creating a SharePoint list provides a solid foundation for users to build and manage lists that meet their specific needs. With practical applications in various business areas, such as task management, contact management, issue tracking, project management, and customer relationship management, SharePoint lists offer a versatile and scalable solution for any organization.
The step-by-step guide on creating a SharePoint list provides a solid foundation for users to build and manage lists that meet their specific needs. With practical applications in various business areas, such as task management, contact management, issue tracking, project management, and customer relationship management, SharePoint lists offer a versatile and scalable solution for any organization.
Author

Sherry Rajani, is a tie-loathing adventurer and troublemaker who believes in turning ideas into reality. Even though his experience is primarily in Microsoft Cloud and On-Premise Solutions, Sherry has also lead teams building Custom ERPs, Mobile Applications, Data Management and other solutions.
After working in the Toronto Technology Industry for a while, Sherry started his own Technology Consulting Firm, Code Creators Inc., specializing in the Office 365 Stack ranging from SharePoint Online, the Power Platform, PowerBI and Microsoft Teams.